
How to Start Your Wordpress Blog in 4 Easy Steps

HOW TO START A WORDPRESS BLOG IN 4 EASY STEPS
I may not be a mind reader, but if you’re reading this blog post, I’m going to take a wild guess and say you’re thinking about starting a blog.
(Am I right? Do I have an untapped power I should pursue further?)
But not only are you thinking about starting a blog, you’re also thinking about how and where to start… period.
There's a lot of information about blogging that it can become overwhelming and, oftentimes, paralyzing as you try to make sense of it all. Sometimes, TOO much information can hinder your ability to actually get started.
All aboard the struggle bus!
Trust me when I tell you I’ve been in your situation before. There’s nothing profound about my early beginnings in blogging, no a-ha moments or impressive underdog stories. I was simply a girl with an idea who was living on a Google search and a prayer to get started.
Like you, I was overwhelmed. Heck, I had never even heard of Wordpress before. Yeah, that’s the level of newbie I was when I showed up on the blogging scene.
But, I’m happy to report that in my 7+ years of blogging, I have learned what it takes to run a self-hosted Wordpress.org site. And even though I’ve made a looot of progress over the years, I’ll never forget the humble beginnings of where I started— YIKES.
If only I had had better resources to go by...
Which brings me to the intention behind this post— to lay out everything you need in one place to get your blog going.
If you happen to be perusing my blog and get inspired to start your own (um, that’d be awesome!), I want you to have the same tools I so desperately needed starting out. I want to provide you with a clear and very straightforward understanding of how simple it actually is to start your own Wordpress site.
Written by someone who started with nothing.
For someone who is starting with nothing.
The good news though is that by the end of this, you’ll have the confidence to take that next step in your blogging journey. Because if I can do it, literally anyone can.
You ready?
To keep this blog running, this post may contain affiliate links. Thank you for your support!
Choose a web host and domain name
Before we roll up our sleeves and get into the nitty gritty of setting up camp on the internet, let’s first make a note of an important distinction.
When it comes to Wordpress, you have two options: wordpress.COM or wordpress.ORG.
Truth be told, I didn’t realize these were two separate entities when I started blogging and opted for a free subscription with wordpress.COM. Yeah, it’s free. And while it may sound enticing when you’re starting out, if you’re looking to grow your blog in an impactful way, this isn’t the way to go.
Unfortunately, I learned this the hard way. And I endured the actual living nightmare of transferring my blog over to wordpress.ORG. From that day forward, I vowed to warn every future blogger to not become a victim to this train wreck. If you’re going to take blogging seriously, please don’t think twice. wordpress.ORG is the only way.
Now back to our regular scheduled programming.
In order to start a blog or website using wordpress.org, you will need a hosting site to build on.
Think of it like you were building a house. You can’t just lay down a foundation floating in thin air. You need land, you need to purchase property before you start the building process.
Building a website works the same way, so I use Bluehost as my hosting site. It is the land in which I’m going to build my little internet home on. It’s user-friendly, has great customer service, and the best part about using their hosting services?
It costs less than a grande at Starbucks per month.
This link will take you directly to the sign up page where you can get started. (Should you choose to go with Bluehost I will receive a small commission at no additional cost to you. Just wanted to be upfront about that!)
Setting up your account
While setting up your account is pretty easy and straightforward, let’s break this down into smaller steps as to avoid any confusion.
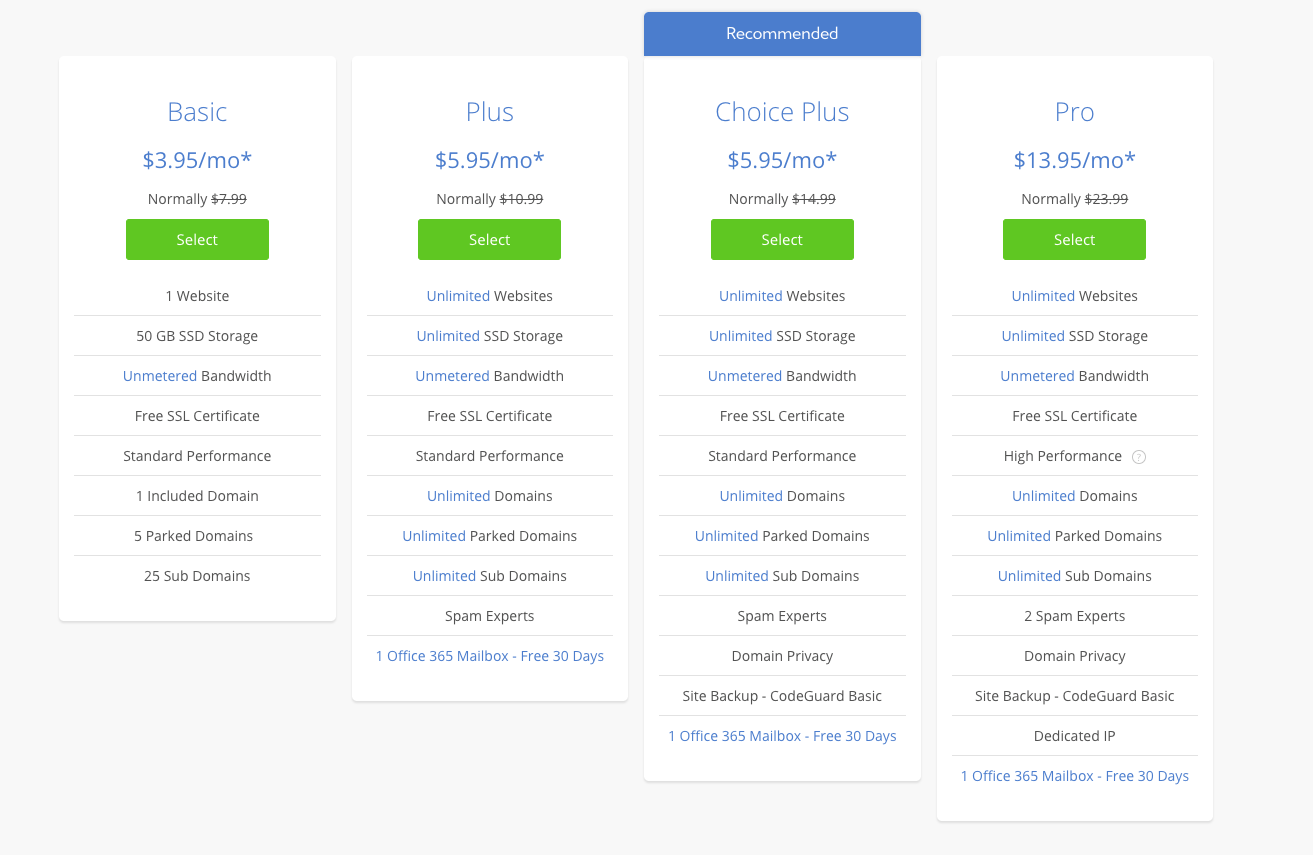
Choose your plan
Below is a screenshot of what you’ll see in choosing your plan. For smaller blogs like mine, the basic plan offers exactly what I need. But choose based on your long-term goals and what you feel will be the best fit.
Make a domain name
After choosing which plan best suits your needs, it’s time to come up with a domain name! A couple of branding tips to keep in mind:
- Make sure it’s easy to spell. When you’re telling others about your new blog, you don’t want to quite literally spell it out for them.
- Check social media to see if a matching username is available. Sticking with one name across all social media/website/email channels will help streamline your brand.
- Don’t be afraid to use your name as your domain. So often people shy away from putting their face behind the brand, but adding a personal element behind what you do is what separates you from the rest!
Fill in your information
This step is self explanatory. You will be asked to fill out your name, address, and all that other necessary stuff. Then you’ll finish the registration by providing your credit card information. Easy peasy.
Install Wordpress
Badda-bing! You are officially a part of the Bluehost family. Next up: actually installing Wordpress.
Although Bluehost doesn’t come with Wordpress already installed, it should take no more than 5-10 minutes to set things up. Again, the process is super simple and easy to figure out, but never hesitate to reach out to Bluehost’s 24/7 customer service with questions. Hello! That’s what they’re there for! But hopefully these steps will take you through the process without any headaches.
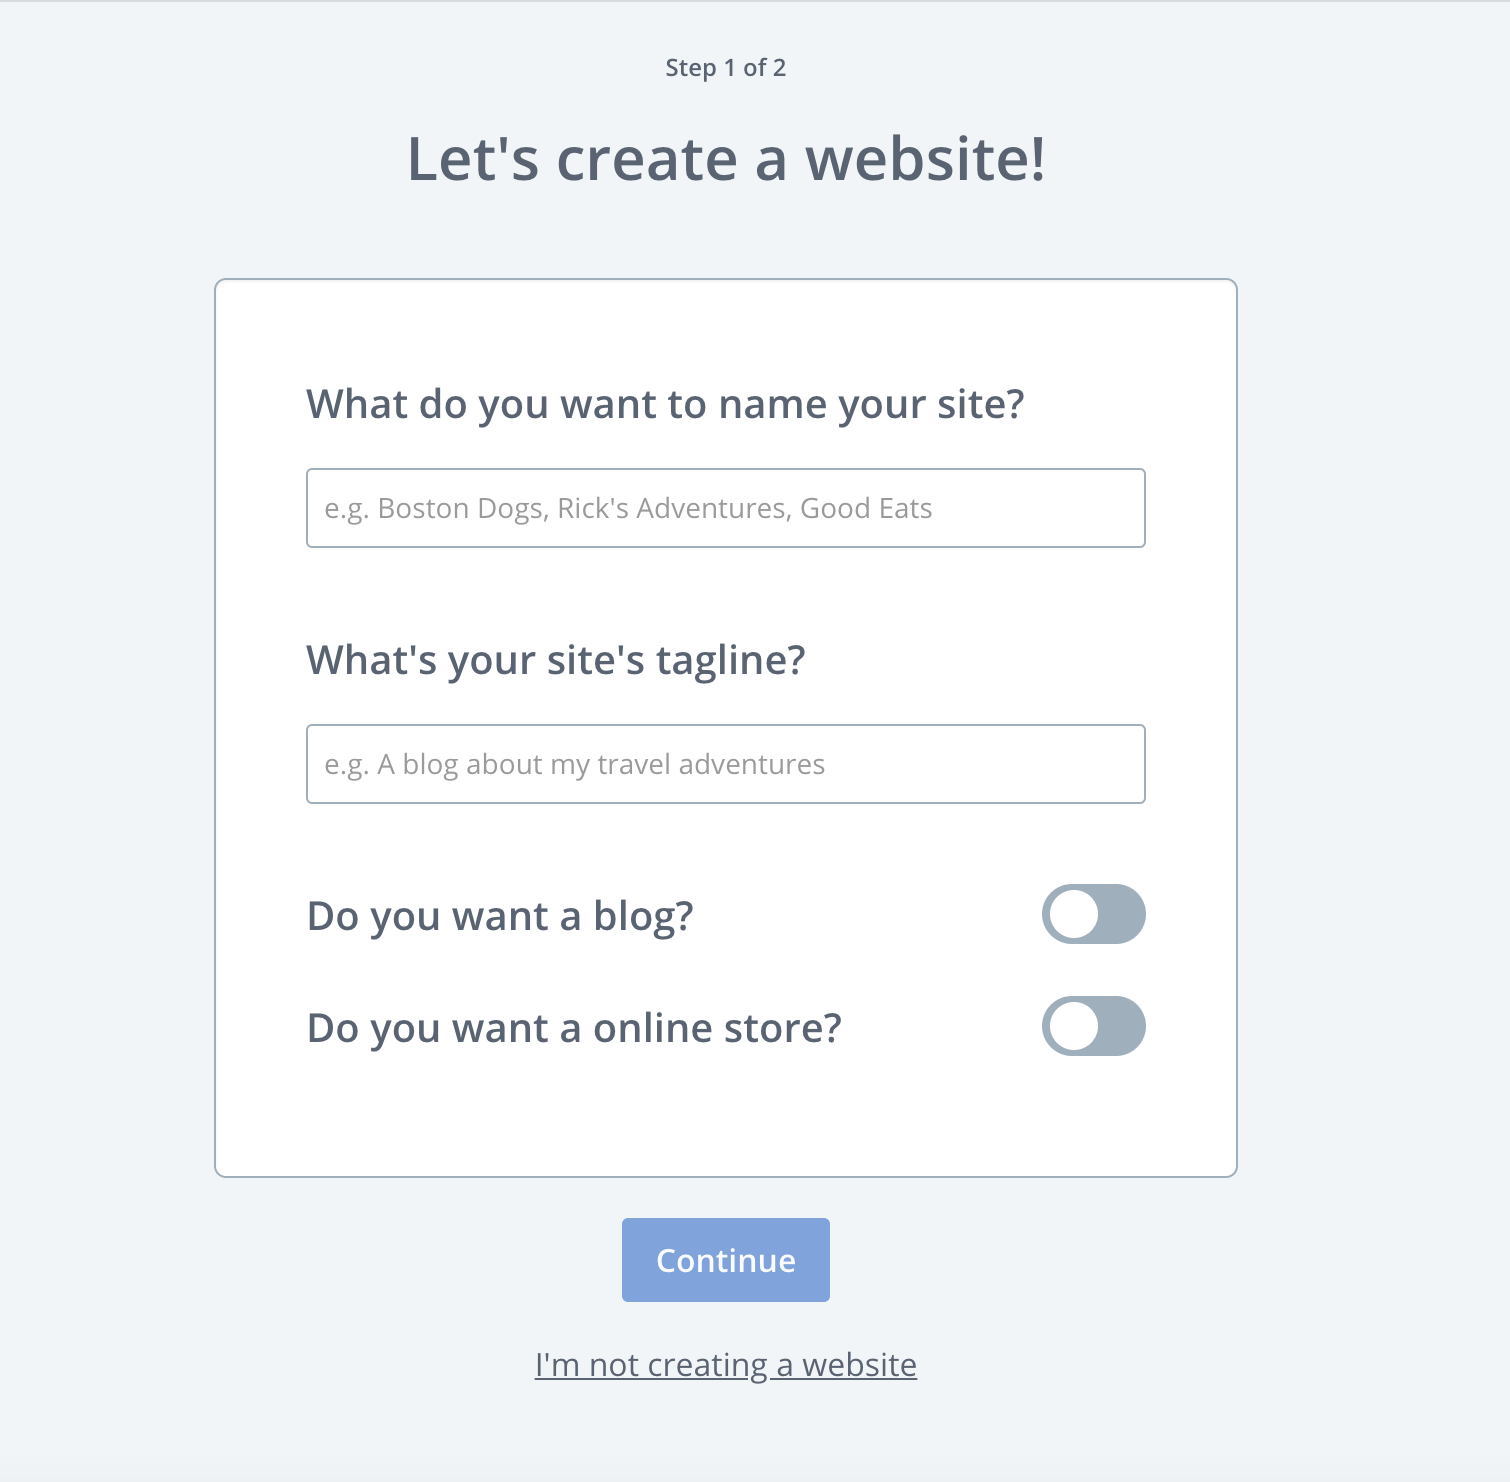
- Click My Sites over in the left sidebar, then choose Create Site.
- Choose a name for your Wordpress blog and tagline. Your name is what will show up in search engines.
- Select that domain name you just created to direct it to this Wordpress site.
- Pick a theme, but don’t worry about getting so caught up in the many options. You can always change this later!
- Finally, CELEBRATE! You’re now a ~*blogger*~ and ready to tackle the final step.

Write, write, write
A house is not a home without the love that fills it. And the same goes for your blog!
Now comes the fun part. It’s time to fill it with love— or in this case, words. Make sure that before you start promoting your blog, people have value to gain from it. And you do that by spilling your heart out onto your keyboard.
I know it may seem overwhelming. I know it may seem like there are a million different directions to go in and you don’t know which one to choose. But just like building a house, you start small. Nail by nail, brick by brick, word by word. You’ll eventually see things falling into place. You’ll event find your rhythm and see the culmination of these tiny action steps yielding great value.
So, start small. Learn as you go. Adapt as you please. With discipline, effort, and a yearning to help people through your words, I promise you’ll be equipped with all you need.
You got this.
*Bonus Tip*
So, you’ve pumped out some content that’s beginning to take traction? Congratulations! Now it’s time to uplevel your blog in a major, yet incredibly easy, way.
I’m a visual person which means I’m also a sucker for aesthetics— it’s the creative in me. And I used to see all these bloggers with such GORGEOUS Wordpress sites and envy them in the best way possible. The problem was I never thought I had the talent or knowledge to truly customize my site in a way that made it my own.
Here’s the thing about web design. When done right, it can help increase traffic, convert sales, and earn credibility as a blogger. When I started out using Wordpress.org, my blog was less than impressive. But, soon after I discovered a tool that changed the game for me:
Low and behold: the Elementor plugin.
Elementor is a DRAG & DROP webpage builder which means exactly how it sounds. Instead of learning extensive code, you simply use the tools provided by Elementor to drag into your blog, drop where you please, and customize to your brand’s aesthetic. But wait there’s more.
It’s responsive for tablet and mobile devices (hello higher ranking SEO), premade themes for you to choose from, and it’s completely free. There are premium offerings which I use on this blog, but to start out? I recommend the zero dollars down plan!
If you’re like “hey Alyssa please stop babbling and show me how to get my hands on this,” okay, I gotchu. Simply:
- Head to Elementor and click Get Started
- Enter your email address to sign up for free
- Elementor will then automatically download to your computer— be sure to unzip it!
- Go to your Wordpress dashboard
- Locate Plugins in the left hand sidebar
- Click Add New at the top
- Upload and activate your plugin
- Get to building that dream website of yours!
Yeah, it’s that simple. And SO worth it! I hope you enjoy it as much as I do. You’re on your way to doing big things, my friend!
Share on facebookShare on pinterestShare on twitterShare on linkedin